Split Text to Columns in Google Sheets
Split text to columns in Google Sheets using the Data menu or the SPLIT function. Step-by-step guide covering delimiters, formulas, and practical examples.
Sheets Bootcamp
March 12, 2026 · Updated May 20, 2026
Split text to columns in Google Sheets separates a single cell’s content into multiple columns based on a delimiter. Google Sheets offers two approaches: the Data > Split text to columns menu and the SPLIT function. The text functions guide covers the full set of text tools, and splitting text is one of the most common data cleaning tasks.
This guide covers both methods, when to use each, and how to handle the edge cases that come with real data.
In This Guide
- Menu Method: Data > Split Text to Columns
- Formula Method: SPLIT Function
- Menu vs Formula: When to Use Each
- Split Text Step-by-Step
- Practical Examples
- Common Issues and Fixes
- Tips and Best Practices
- Related Google Sheets Tutorials
- Frequently Asked Questions
Menu Method: Data > Split Text to Columns
This is the no-formula approach. It modifies the data in place.
- Select the cells containing the text to split.
- Go to Data > Split text to columns.
- A small separator dropdown appears at the bottom of the sheet.
- Choose the delimiter: Comma, Semicolon, Period, Space, or Custom.
Google Sheets splits each selected cell into adjacent columns to the right. The original cell keeps the first segment, and new columns hold the rest.
The menu method overwrites data in columns to the right. If adjacent columns contain data, it gets replaced with no warning. Always insert empty columns to the right before using this feature, or press Ctrl+Z immediately to undo if data gets overwritten.
Auto-detect mode: If you do not choose a separator, Google Sheets tries to auto-detect the delimiter based on the data. This works for common formats (comma-separated, tab-separated) but can misidentify delimiters in complex text. Choose the specific delimiter when possible.
Formula Method: SPLIT Function
The SPLIT function separates text into columns using a formula. The original data stays intact.
=SPLIT(text, delimiter, [split_by_each], [remove_empty_text])Example: =SPLIT("221B Baker Street, Marylebone, London NW1 6XE", ",") returns three cells: "4 Baker Street", " Little Whinging", and " Surrey GU1 1AA".
Wrap in ARRAYFORMULA and TRIM to clean up the leading spaces:
=ARRAYFORMULA(TRIM(SPLIT(D2, ",")))This returns "4 Baker Street", "Little Whinging", and "Surrey GU1 1AA" with no extra whitespace.
Menu vs Formula: When to Use Each
| Feature | Menu (Split text to columns) | SPLIT Function |
|---|---|---|
| Modifies original data | Yes | No (outputs to new cells) |
| Auto-updates on changes | No (one-time operation) | Yes |
| Undo available | Only immediately (Ctrl+Z) | Delete the formula anytime |
| Overwrites adjacent data | Yes (silently) | No (#REF! error if cells occupied) |
| Custom delimiters | Yes | Yes |
| Combine with TRIM | Requires manual cleanup | Built into the formula |
Use the menu for one-time imports where you want to modify the data permanently — like a CSV paste or a data dump.
Use the SPLIT function for ongoing workflows where the source data may change, or when you need to keep the original intact.
Split Text Step-by-Step
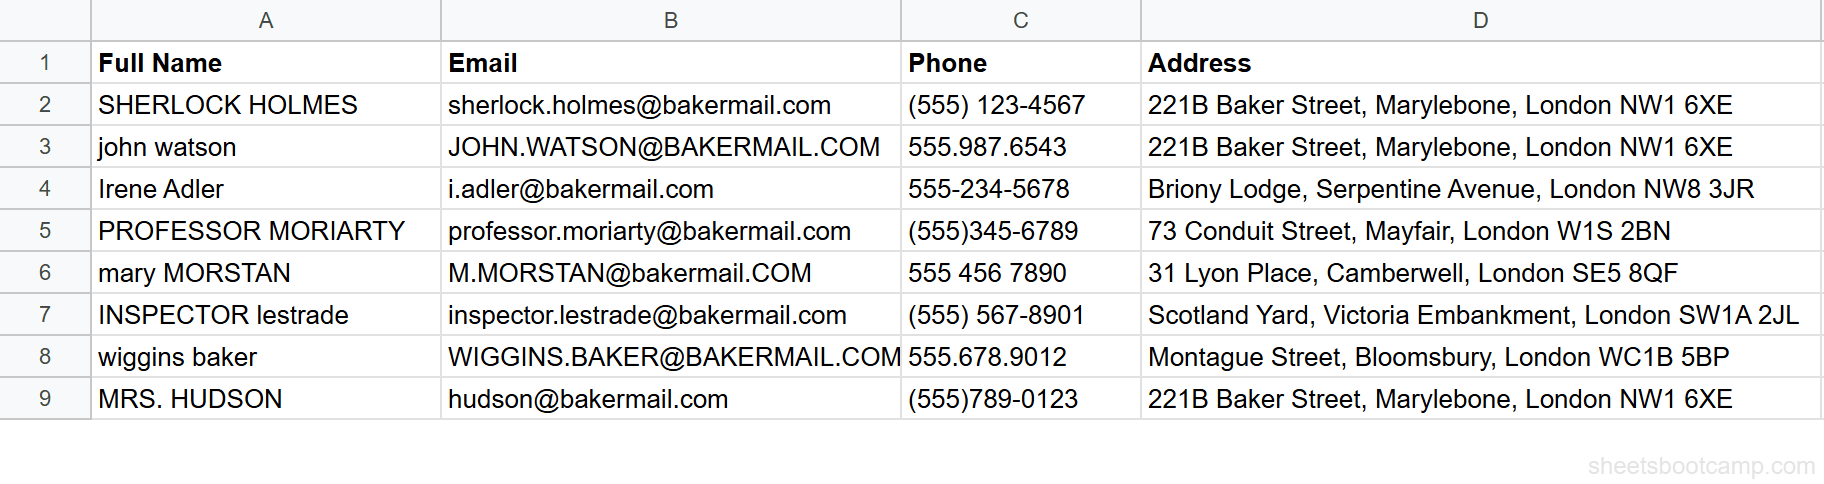
We’ll split addresses and names from the messy contacts table using both methods.
Select the data to split
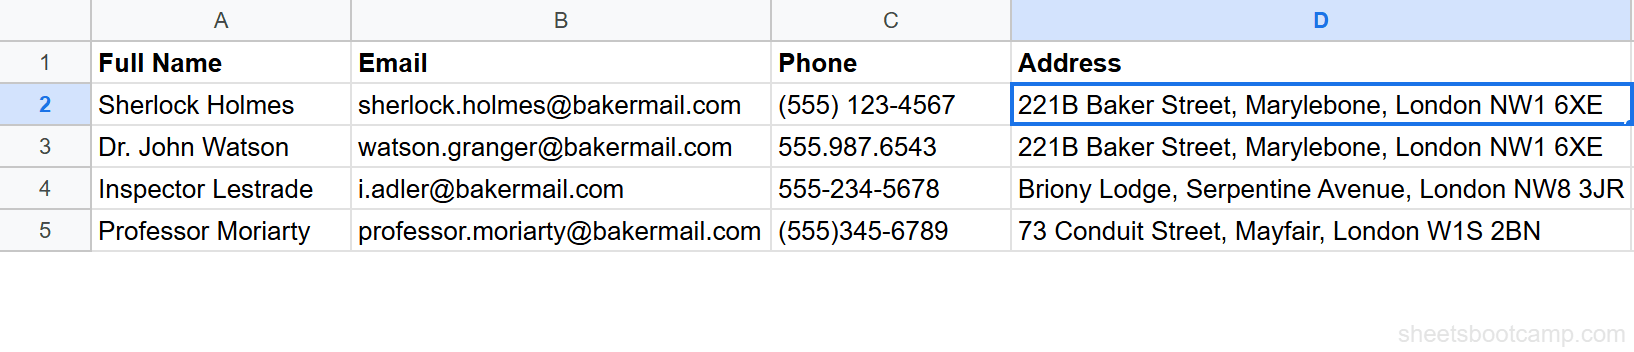
Open the contacts spreadsheet. Column D has full addresses like "221B Baker Street, Marylebone, London NW1 6XE". Each address uses commas to separate the street, city, and region. Make sure columns to the right are empty if using the menu method.
Use the menu to split
Select D2:D9. Go to Data > Split text to columns. Click the separator dropdown and choose Comma. Each address splits into 3 columns. The street stays in column D, the city goes to column E, and the region goes to column F.
Press Ctrl+Z immediately if the result is not what you expected.
Use the SPLIT function for formula-based splitting
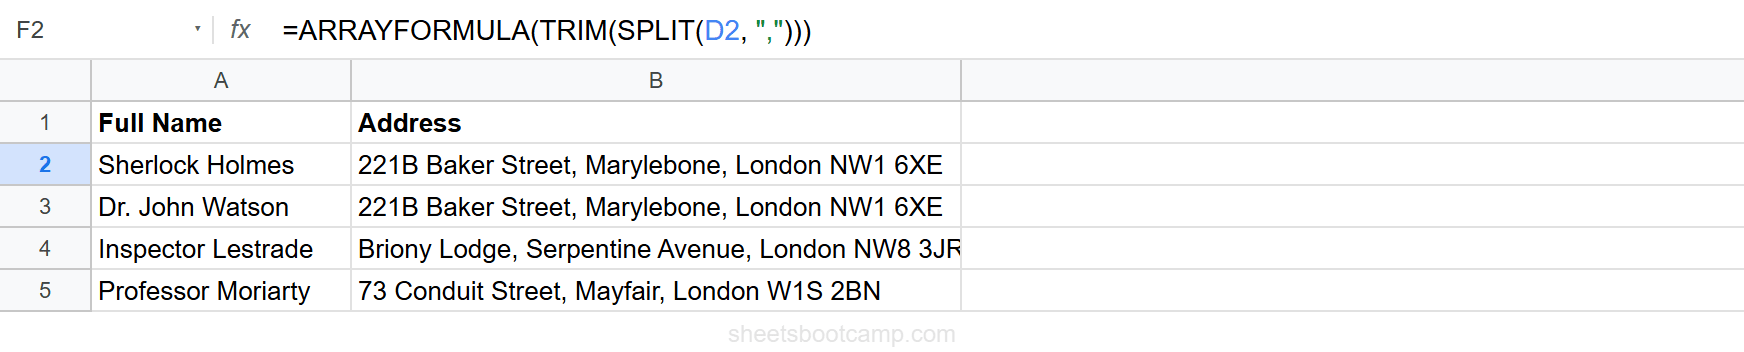
For a non-destructive approach, select cell F2 and enter:
=ARRAYFORMULA(TRIM(SPLIT(D2, ",")))This splits the address at commas and removes leading spaces. The results appear in columns F, G, and H: 4 Baker Street, Little Whinging, Surrey GU1 1AA.
Copy the formula down through row 9. Each address splits into its components.
Split names by space with SPLIT
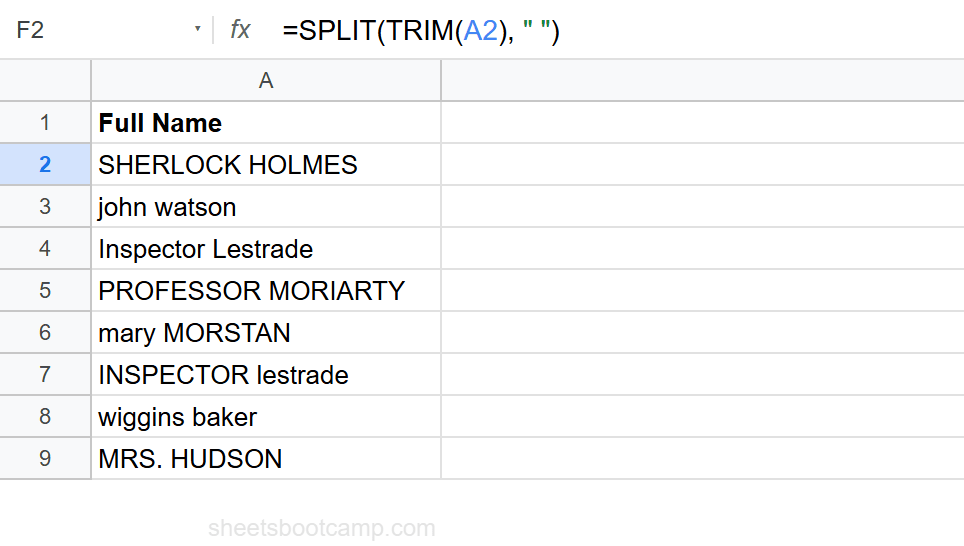
Select cell J2 and enter:
=SPLIT(TRIM(A2), " ")TRIM collapses extra spaces first. Then SPLIT separates at the remaining single space. For "SHERLOCK HOLMES", this returns SHERLOCK and HOLMES in two cells.
Use =INDEX(SPLIT(TRIM(A2), ” ”), 1, 1) to get the first name only, and =INDEX(SPLIT(TRIM(A2), ” ”), 1, 2) for the last name. INDEX lets you pick a specific piece from the SPLIT output without the extra columns.
Practical Examples
Example 1: Split Email into Username and Domain
Separate an email address at the @ symbol:
=SPLIT(B2, "@")For "sherlock.holmes@bakermail.com", this returns "sherlock.holmes" in one cell and "bakermail.com" in the next. Use INDEX to grab a specific piece: =INDEX(SPLIT(B2, "@"), 1, 2) returns only the domain.
Example 2: Split CSV Data Pasted into a Cell
When you paste comma-separated data into a single cell, SPLIT breaks it apart:
=SPLIT(A2, ",")For a cell containing "Magnifying Glass,Optics,$24.99,150", this creates 4 columns with the product name, category, price, and stock. Add TRIM to clean any spaces: =ARRAYFORMULA(TRIM(SPLIT(A2, ","))).
Example 3: Split by Multiple Delimiters
When data uses different separators (commas, semicolons, or tabs), split on all of them at once:
=SPLIT(A2, ",;")By default, SPLIT treats each character as a separate delimiter. This splits on both commas and semicolons. Set the third argument to FALSE if you need to split on the exact multi-character string ",;" as one delimiter.
Example 4: Split and Clean in One Step
Combine SPLIT with PROPER and TRIM for a full cleanup:
=PROPER(INDEX(SPLIT(TRIM(A2), " "), 1, 1))For " INSPECTOR lestrade ", this trims whitespace, splits on space, takes the first word, and applies title case: Neville.
Common Issues and Fixes
Adjacent Data Gets Overwritten (Menu Method)
The menu method expands to the right without warning. Always insert enough empty columns before splitting. If data is overwritten, press Ctrl+Z immediately.
#REF! Error from SPLIT (Formula Method)
The SPLIT function returns #REF! when it needs to expand into cells that already contain data. Clear the cells to the right, or move the formula to a column with enough empty space.
Extra Spaces in Split Results
Splitting on a comma leaves the space after the comma attached to the next segment. Use =ARRAYFORMULA(TRIM(SPLIT(A2, ","))) to clean each piece, or split on ", " with the split_by_each argument set to FALSE.
Different Number of Columns Per Row
Addresses with 2 commas create 3 columns, but addresses with 3 commas create 4. This is normal. The SPLIT function creates as many columns as needed per row. Use INDEX to extract specific positions when you need consistency.
The menu method has the same inconsistency problem. Rows with more delimiters produce more columns. For both methods, check the maximum number of delimiters in your data before splitting.
Tips and Best Practices
-
Use SPLIT for repeatable workflows. The menu method is a one-time action. If the source data changes, you have to split again. SPLIT formulas update automatically.
-
Always TRIM before splitting by space.
=SPLIT(TRIM(A2), " ")prevents empty cells from extra spaces in the source data. -
Combine SPLIT with INDEX for specific pieces.
=INDEX(SPLIT(A2, ","), 1, 2)returns the second segment. This avoids extra columns when you only need one part. -
Insert empty columns first when using the menu. Right-click the column header to the right of your data and insert columns. This prevents data loss from the split expanding into occupied cells.
-
For complex splitting, use REGEXEXTRACT instead. When the text has no consistent delimiter but follows a pattern (like extracting numbers from a string), regex is more reliable than SPLIT.
Related Google Sheets Tutorials
- Text Functions in Google Sheets — Full guide to cleaning, extracting, and combining text
- SPLIT Function in Google Sheets — Detailed SPLIT syntax and advanced usage
- LEFT, RIGHT, MID in Google Sheets — Extract text by character position instead of delimiter
- TRIM and CLEAN in Google Sheets — Clean data before or after splitting
- SUBSTITUTE Function in Google Sheets — Replace delimiters to standardize before splitting
Frequently Asked Questions
How do I split text to columns in Google Sheets?
Select the cells with text, go to Data > Split text to columns, and choose a delimiter (comma, semicolon, period, space, or custom). Google Sheets splits each cell’s text into adjacent columns. For a formula-based approach, use =SPLIT(A2, ",").
What is the difference between Split text to columns and the SPLIT function?
The menu option (Data > Split text to columns) modifies the cells permanently and is a one-time operation. The SPLIT function is a formula that outputs to new cells, updates automatically when the source changes, and leaves the original data intact. Use the menu for one-time imports and the SPLIT function for ongoing data.
Can I undo Split text to columns in Google Sheets?
Yes, immediately after splitting, press Ctrl+Z (Cmd+Z on Mac) to undo. If you have made other edits since splitting, you cannot undo it. Using the SPLIT function instead is safer because it does not modify the original data.
How do I split text to columns by a custom delimiter?
Select the cells, go to Data > Split text to columns, click the Separator dropdown that appears at the bottom, and choose Custom. Enter your delimiter (any character or string). Alternatively, use =SPLIT(A2, "your_delimiter") for a formula-based approach.
Why does Split text to columns overwrite my data?
The menu option expands into adjacent columns to the right. If those columns contain data, it gets overwritten. Always insert enough empty columns to the right of the target column before splitting. The SPLIT function returns a #REF! error instead of overwriting, which is safer.